Floodlight Cam Installation: 1 Easy Guide

Floodlight Cam Installation: 1 Easy Guide
Why Floodlight Cameras Are Essential for Modern Home Security
Floodlight cam installation is one of the most effective ways to boost your home’s security while adding convenience and peace of mind. These smart devices combine bright LED lighting, high-definition video recording, and motion detection into one powerful security solution.
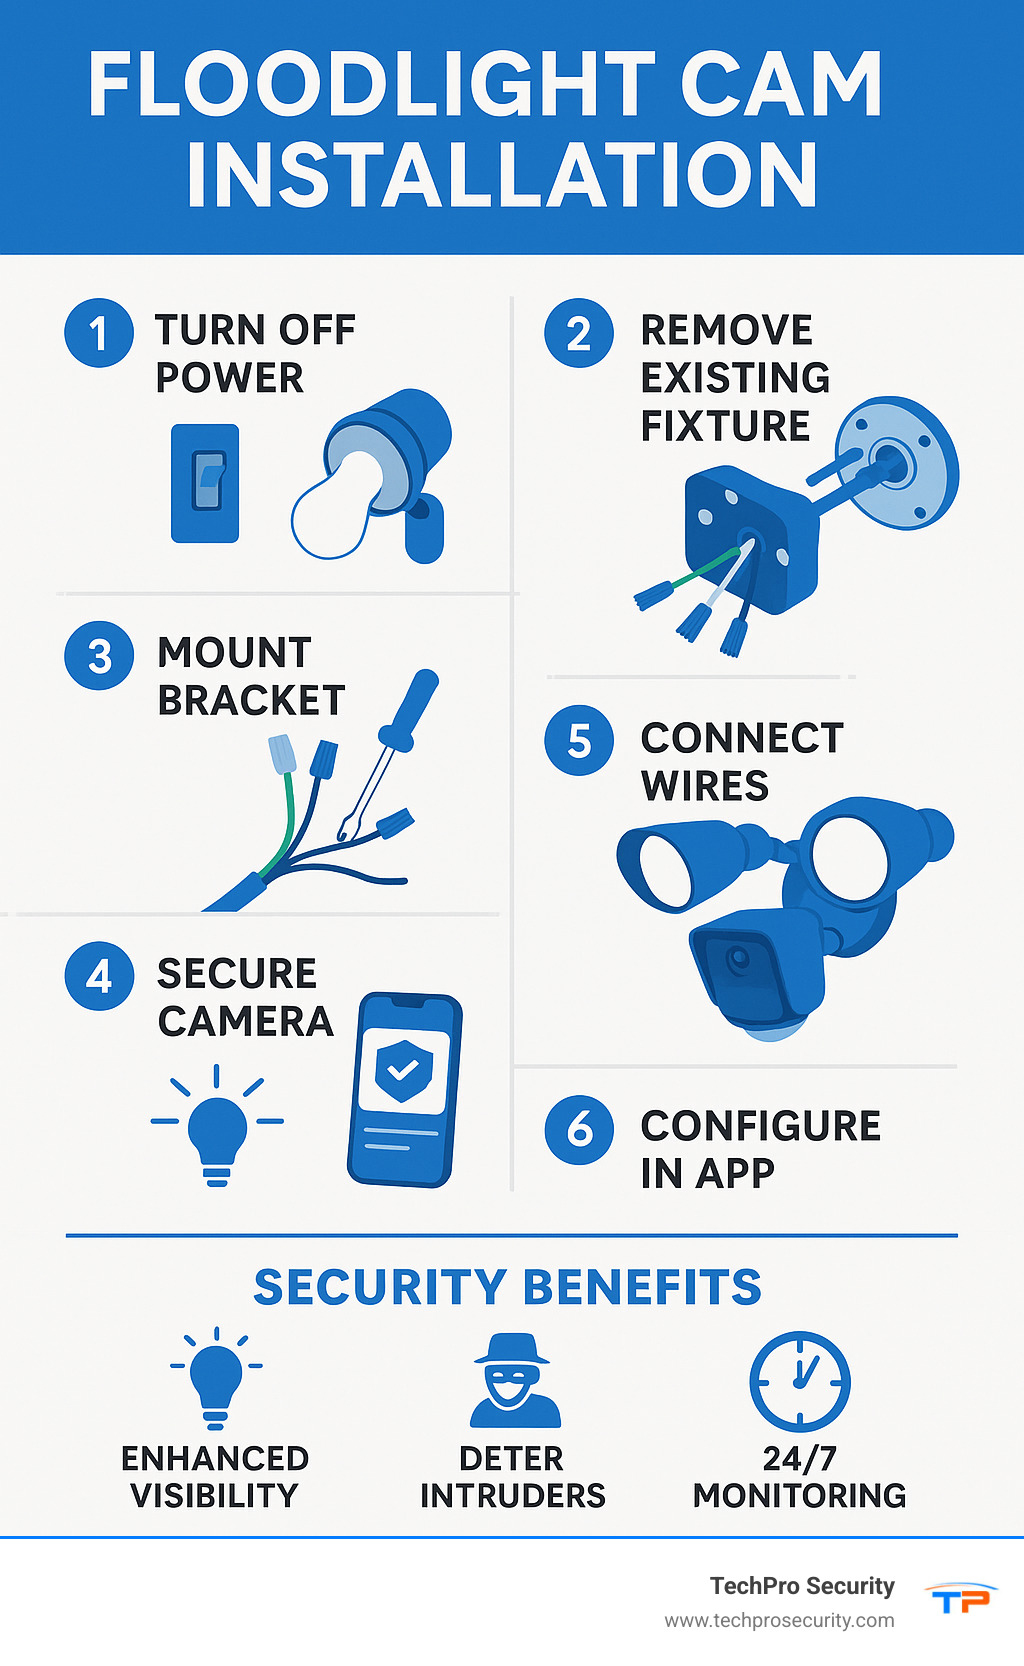
Quick Installation Overview:
- Turn off power at the circuit breaker
- Remove existing fixture and disconnect wires
- Mount new bracket to weatherproof junction box
- Connect wires (ground, neutral, hot) with wire nuts
- Secure camera to bracket and restore power
- Configure through manufacturer’s app
The benefits of installing a floodlight camera go far beyond basic security. These devices provide improved visibility around your property, deter potential intruders with motion-activated lighting, and offer 24/7 monitoring capabilities through your smartphone. Many homeowners find that the bright illumination alone makes them feel safer when arriving home after dark.
Modern floodlight cameras also integrate seamlessly with smart home systems, allowing you to control lighting, receive instant alerts, and even communicate with visitors through two-way audio. The installation process typically takes about 30 minutes for those replacing an existing floodlight, as long as you have proper wiring and a suitable junction box.
I’m Brad Besner, and I’ve been helping South Florida homeowners secure their properties through companies like TechPro Security Products since 2007. My team has handled countless floodlight cam installation projects, and I’ve seen how these devices provide both immediate deterrence and long-term security value for families throughout our community.
Before You Begin: Preparation is Key
Think of your floodlight cam installation like baking your grandmother’s famous chocolate chip cookies – you wouldn’t start mixing ingredients without checking you have everything first, right? The same principle applies here, except instead of flour and sugar, we’re dealing with electricity and power tools. Trust me, being prepared makes all the difference between a smooth installation and a frustrating afternoon.
Preparing for Your Floodlight Cam Installation
Let’s start by gathering everything you’ll need. Most floodlight cameras are pretty generous with what they include in the box, but you’ll still need some basic tools that most homeowners already have tucked away in their garage or toolbox.
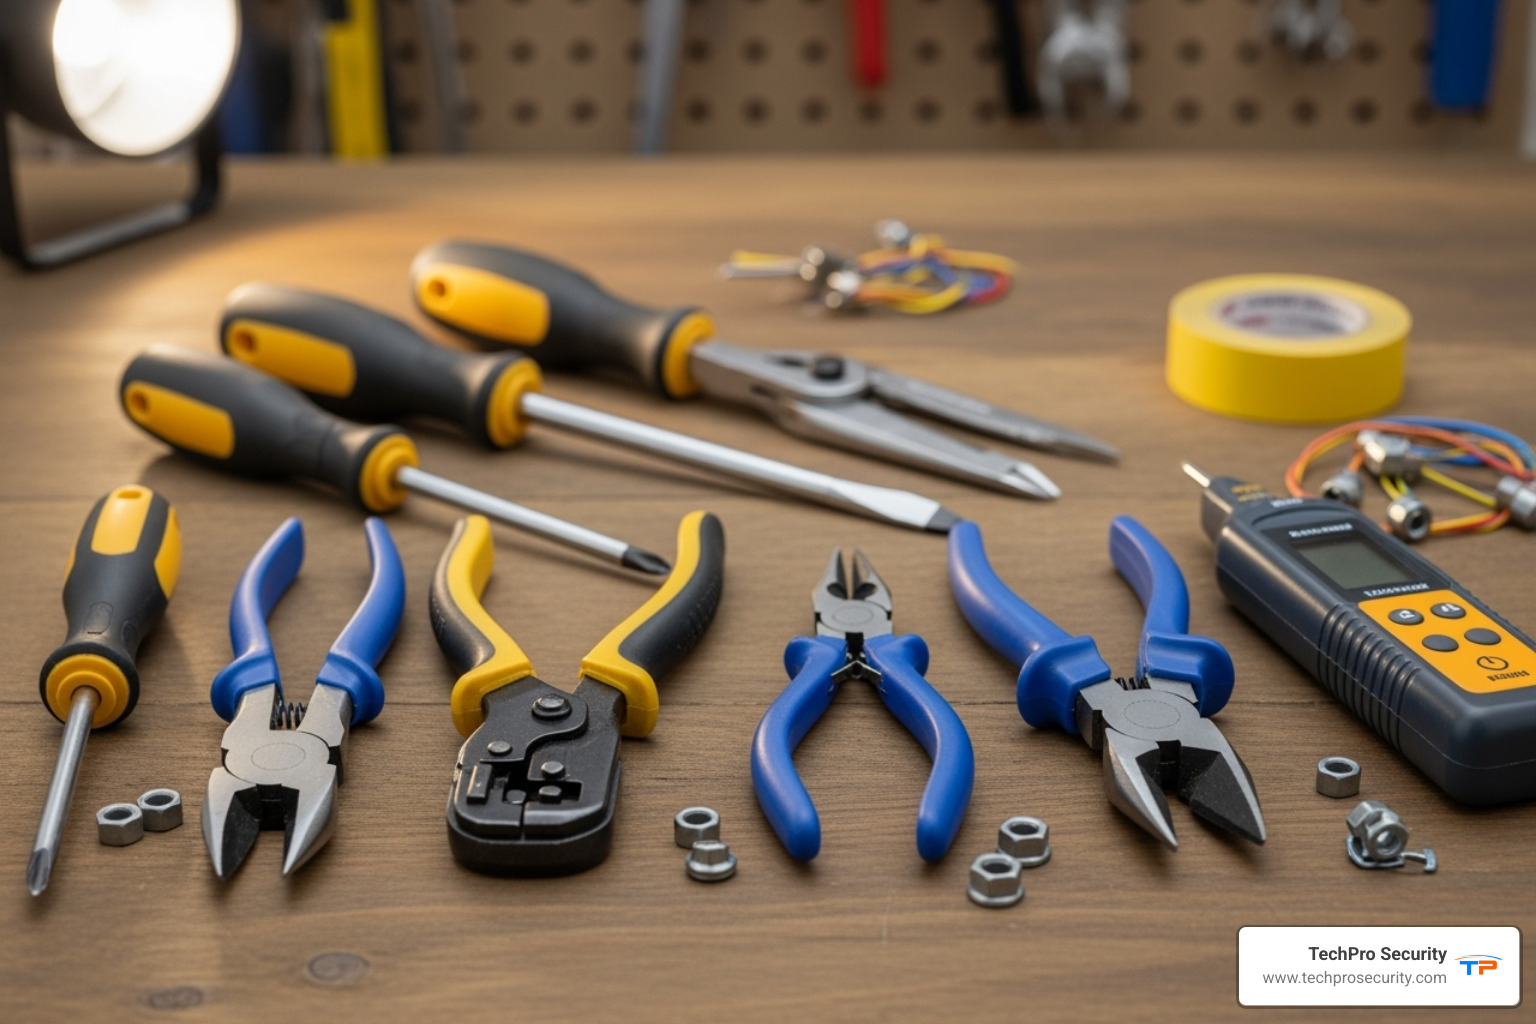
Your essential tools should include a Phillips screwdriver for the various screws you’ll encounter, and a voltage tester – this little device is your best friend when it comes to confirming the power is actually off. You’ll also want a sturdy ladder since most installations happen at least 9 feet off the ground, wire strippers for any wire preparation, and a power drill to make mounting quicker and easier.
Here’s a pro tip I’ve picked up over the years: grab a pencil from your kitchen drawer. It sounds odd, but wrapping the existing wires around it keeps them organized and accessible while you’re working. It’s one of those simple tricks that makes the job so much smoother.
Your floodlight camera box typically includes the mounting bracket, various screws for different junction box types, wire nuts for electrical connections, and sometimes helpful extras like an S-hook to temporarily hold the camera during wiring. Some manufacturers even throw in rubber stoppers for unused screw holes – it’s these little touches that show they’ve thought about the installation process.
Safety First: Critical Precautions
Now, let’s talk about the serious stuff. Working with electricity isn’t something to take lightly, and I’ve seen too many DIY projects go sideways because someone skipped the safety steps. Your floodlight cam installation should improve your security, not create new dangers.
Turn off the power at your circuit breaker or fuse box – this isn’t optional. Find the breaker that controls your existing floodlight fixture. If you’re not sure which one it is, turn off the main breaker to your entire home. Yes, it’s inconvenient, but it’s also safe.
But here’s the thing – don’t just trust the switch. Verify the power is actually off with your voltage tester. Touch it to each wire you’ll be handling. No beeps, no lights, no power. This simple step could literally save your life.
Ladder safety deserves its own mention. Make sure your ladder is on firm, level ground, and if possible, have someone spot you. Don’t try to reach too far – move the ladder instead. It takes an extra minute but prevents a trip to the hospital.
When you’re handling the electrical wiring, treat every wire like it’s live until proven otherwise. If you’re uncomfortable with any part of the electrical work, there’s no shame in calling a licensed electrician. Some areas actually require professional installation or permits, so check your local building codes too.
Choosing the Optimal Location
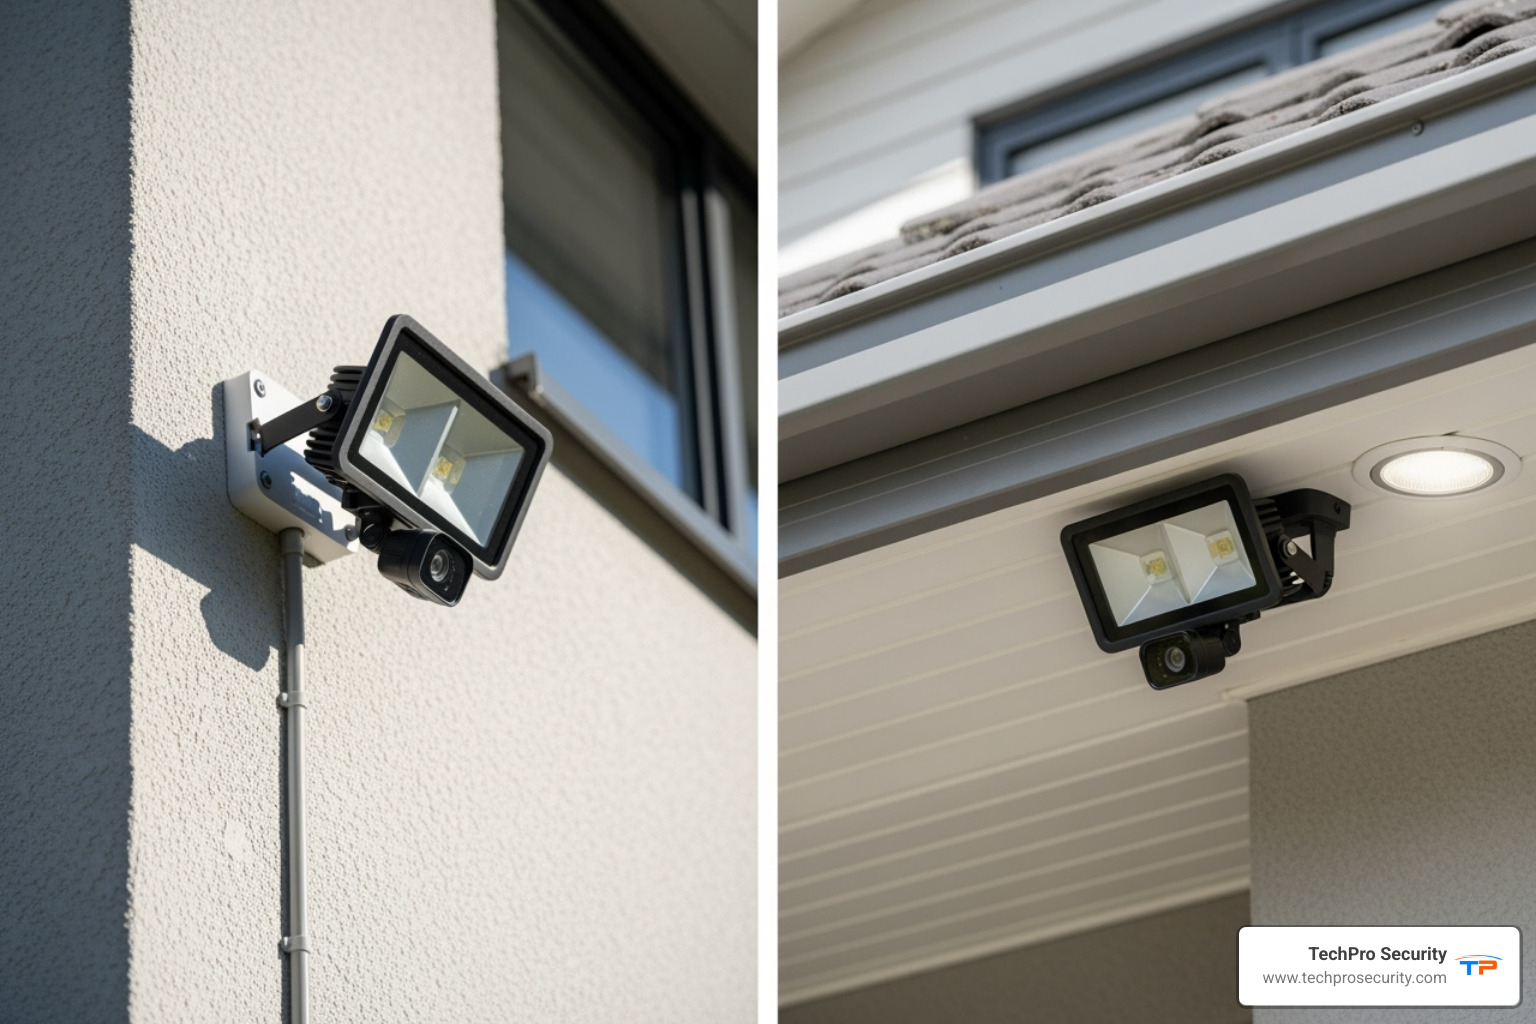
Location is everything in real estate, and it’s equally important for your floodlight camera. The perfect spot balances security coverage, lighting effectiveness, and practical installation considerations.
Mount your camera at 9 to 10 feet high for the best results. This height gives you optimal motion detection coverage while keeping the camera out of easy reach. The field of view should cover your key areas – think driveways, entryways, or side paths where someone might approach your home.
Avoid obstructions like tree branches or decorative elements that could block the camera’s view or trigger false motion alerts. I can’t tell you how many times I’ve seen perfectly good cameras rendered useless by an overgrown bush that nobody thought about during installation.
Wi-Fi signal strength is crucial since these cameras depend on your home network. Test the signal with your phone at the installation spot before you start. A weak signal means dropped connections and missed alerts – definitely not what you want from a security device.
Since floodlight cameras are hardwired to your electrical system, you’ll need access to an existing junction box or the ability to install a new one. Choose a location near your current fixture if you’re doing a replacement, or plan for more complex wiring if you’re starting from scratch.
For the complete picture of how your new floodlight camera fits into comprehensive home protection, consider how it works with other perimeter security measures around your property.
Your Step-by-Step Floodlight Cam Installation Guide
Now we’re getting to the exciting part – the actual floodlight cam installation! If you’ve done your prep work properly, this process should flow smoothly. We’re covering the most common scenario here: replacing an existing fixture with your shiny new floodlight camera. Think of it as giving your home’s security a major upgrade in just a few steps.
Step 1: Remove the Existing Light Fixture
With your power safely turned off (and double-checked with that voltage tester), we can start working on the actual fixture removal.
Disconnect the power one more time – I know we’ve mentioned this several times, but it’s worth repeating. Confirm that power is off at the circuit breaker or fuse box. Your safety is worth the extra few seconds this takes.
Unscrew the old fixture carefully from the junction box. Most fixtures are held in place by either a central nut, screws on a mounting plate, or sometimes a combination of both. Take your time here – there’s no rush.
Once the fixture is loose, carefully disconnect the wires by gently pulling the fixture away from the wall to expose the electrical connections. You’ll typically see three wires: the ground wire (usually bare copper or green), the neutral wire (usually white), and the line or hot wire (usually black, sometimes red). Carefully disconnect these by unscrewing the wire nuts or loosening terminal screws.
Here’s a pro tip that has saved me countless headaches over the years: take a photo of the wiring before disconnecting everything. This simple step gives you a visual reference that’s worth its weight in gold when you’re connecting your new camera. Trust me, even experienced installers appreciate having that “cheat sheet” handy!
Step 2: Install the New Mounting Bracket
Your new floodlight camera comes with its own mounting bracket, specifically designed to work with standard electrical junction boxes. This is where the magic begins to happen.
Junction box requirements are pretty straightforward – most floodlight cameras need a 4-inch round UL listed weatherproof electrical box. This ensures you have a secure, safe connection point that can handle outdoor conditions year-round. If your existing box doesn’t meet this standard, you might need to upgrade it, which could mean calling in a professional.
Attach the bracket to your junction box by aligning it with the existing screw holes. Use the screws provided with your floodlight camera to secure it firmly. Pay attention to any directional markings on the bracket – many have an “UP” arrow that needs to point correctly depending on whether you’re doing a wall mount or eave mount.
Ensure the bracket is level using your trusty level tool. This might seem like a small detail, but it makes a huge difference in how professional your installation looks. Plus, if your camera has motion sensors that rely on precise orientation, proper leveling ensures optimal performance.
The key difference between wall mounts and eave mounts comes down to bracket orientation and coverage areas. For wall mounts, the UP arrow points up and you get great horizontal motion detection across paths. For eave mounts, that UP arrow points toward the house, giving you excellent coverage of areas below and in front of the mounting point. Both setups allow the camera to point downward while the lights rotate outward for maximum illumination.
Step 3: Wiring Your Floodlight Camera
This is where that reference photo you took earlier becomes your best friend. We’re connecting your new camera to your home’s electrical system, and precision matters here.
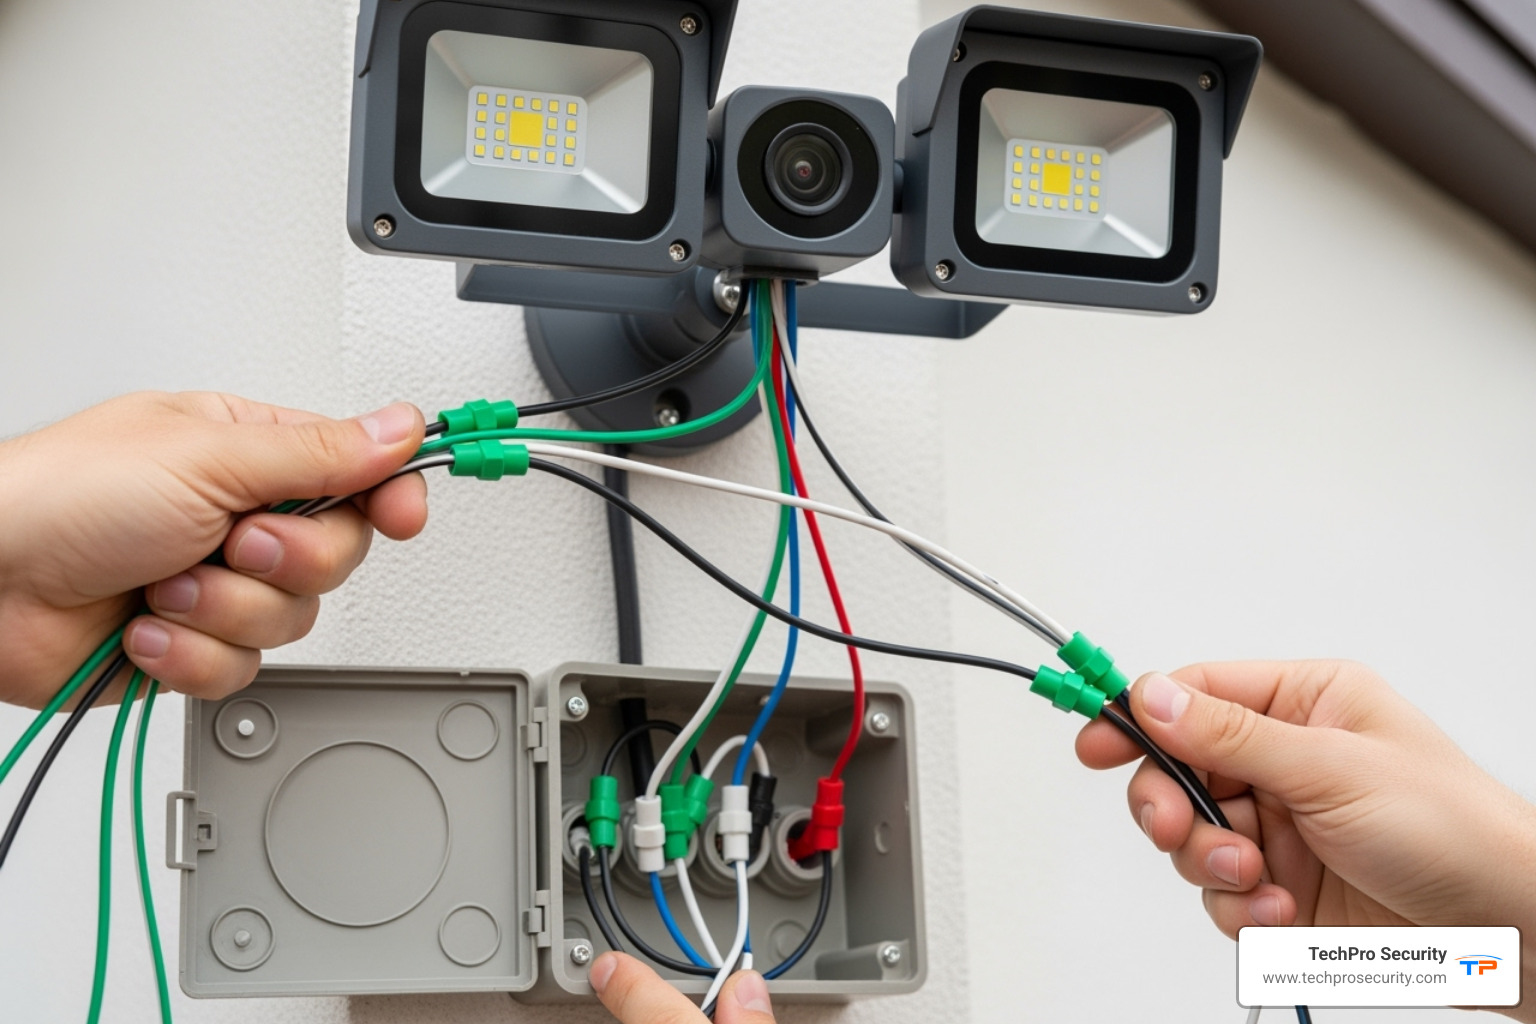
Start with the ground wire connection – this is your safety wire, usually bare copper or green. Connect the ground wire from your home’s junction box to the green or bare copper ground wire from your floodlight camera. Secure these together with a wire nut. This connection protects against electrical shocks, so don’t skip it.
Next, handle the neutral wire, which is typically white on both ends. Connect the white neutral wire from your junction box to the white neutral wire from your camera, securing them with a wire nut.
Finally, connect the line or hot wire – usually black on both sides. This wire carries the power to your device, so make sure this connection is solid. Secure with a wire nut just like the others.
Secure all connections properly by ensuring each wire nut is tight. After twisting them on, give each wire a gentle tug to confirm it won’t pull loose. You shouldn’t see any exposed copper wire outside the wire nuts – if you do, untwist and try again.
Many floodlight cameras include a handy S-hook or nylon strap that lets you temporarily hang the camera from the mounting bracket while making these connections. This frees up your hands and makes the whole process much more manageable.
If you’re more of a visual learner, watch a video guide on wiring a floodlight for additional guidance on this crucial step.
Step 4: Mount the Camera and Weatherproof
We’re in the home stretch now! With all the wiring completed, it’s time to secure everything in place and protect your investment from Florida’s unpredictable weather.
Tuck the wires carefully back into the junction box. Take your time here – you don’t want any wires pinched or strained. They should sit comfortably inside without being forced.
Attach the floodlight camera to the mounting bracket by aligning it with the threaded posts or screw holes. Most cameras slide onto posts or align with specific mounting points. The fit should feel solid and secure.
Secure everything with cap nuts or the screws provided with your camera. Tighten them firmly, but don’t go overboard – overtightening can crack the housing and create bigger problems down the road.
Here’s where we protect your investment for years to come: apply weatherproof silicone sealant around the base where your camera meets the wall or eave. This creates a waterproof seal that prevents moisture from sneaking into the junction box and potentially damaging your electrical connections. You’ll need to pick up outdoor-grade silicone sealant separately, as it’s usually not included with the camera.
Finally, adjust your camera and light angles to cover exactly what you want to monitor. Position the camera lens to capture your desired field of view, and angle the floodlight heads to illuminate the critical areas. This is where you get to fine-tune everything to work perfectly for your specific property layout.
With these four steps complete, your floodlight cam installation hardware is ready to go. Next up, we’ll get everything powered on and configured through your smartphone app.
Finalizing Your Setup and Troubleshooting
The hard work is behind you! Now comes the exciting part – bringing your new security guardian to life and making sure everything works perfectly.
Powering On and App Configuration
Time to flip that breaker back on! Head back to your circuit breaker or fuse box and restore power by switching it back to the “ON” position. You might see your floodlight camera’s lights flash or hear a startup sound – that’s your new security system saying “hello!”
Now for the fun part: connecting everything through your smartphone. Each floodlight camera brand has its own dedicated mobile app, so download the one that matches your device. The setup process is surprisingly straightforward – most apps will guide you through everything step by step.
The first thing you’ll do is connect to Wi-Fi. Here’s a pro tip from my years in the field: make sure you’re connecting to your 2.4GHz network. This frequency offers better range and wall penetration than 5GHz, which is crucial for outdoor devices that might be far from your router.
Once you’re connected, it’s time to customize your settings to fit your specific needs. You’ll want to set motion detection zones to focus on areas that matter – like your driveway or front walkway – while ignoring spots like the neighbor’s sidewalk. Adjust light sensitivity so your lights don’t turn on every time a leaf blows by, and configure your notification preferences so you get alerts when it matters most.
Common Troubleshooting Steps
Even the smoothest floodlight cam installation can hit a bump or two. Don’t worry – I’ve seen it all, and most issues have simple fixes that don’t require calling for help.
If your camera won’t power on, the first thing to check is your wire connections. Turn off that breaker again (safety first!), and double-check that all your wire nuts are tight and secure. Sometimes a wire can work loose during installation. Also, make sure your circuit breaker is fully in the “ON” position – sometimes they can trip partially and look like they’re on when they’re not.
Flickering lights are almost always a wiring issue. Loose connections are the usual suspect here. Also, double-check that you haven’t accidentally connected your floodlight camera to a dimmer switch – these devices need standard, non-dimmable power to work properly.
Wi-Fi connectivity problems can be frustrating, but they’re usually fixable. First, check if your Wi-Fi signal is strong enough at the installation spot. You can test this with your phone before you mounted everything. If the signal is weak, you might need to move your router closer or add a Wi-Fi extender. Sometimes a simple router restart can work wonders too.
Motion detection issues are common in the first few days as you fine-tune everything. If it’s not detecting motion, clean the camera lens and sensor window – you’d be surprised how much dust can accumulate during installation. If it’s too sensitive and alerting you constantly, use the app to adjust the sensitivity settings or redraw your motion zones to exclude problem areas.
What if I Have No Existing Wiring for a Floodlight Cam Installation?
This is where things get more complex, and honestly, it’s often where I recommend calling in the professionals.
If you don’t have an existing floodlight or electrical junction box where you want your camera, you’re looking at a much more involved project. This means running new electrical cable from an existing power source to your desired location, which might involve drilling through walls, running conduit, or even burying underground cables.
You’ll also need to install a new junction box that meets all the weatherproofing and safety requirements. This isn’t just about making it work – it’s about making it safe and up to code.
Because of the specialized knowledge required and the potential safety hazards, we strongly recommend hiring a licensed electrician for this type of work. While replacing an existing fixture is a straightforward DIY project, adding new wiring is a different story entirely.
Professional installation costs typically range from $250 to $800, depending on the complexity of running new wiring and your local market rates. Yes, it’s an investment, but it’s one that ensures your safety and gives you peace of mind that everything is done correctly.
At TechPro Security, we handle these more complex installations regularly throughout South Florida. If you’re facing a situation where new wiring is needed, or if you’d simply prefer the confidence that comes with professional installation, don’t hesitate to reach out. Sometimes the peace of mind is worth every penny.
Frequently Asked Questions about Floodlight Cams
After helping hundreds of South Florida homeowners with their floodlight cam installation projects, I’ve noticed the same questions come up time and time again. Let me share the answers to the most common ones – think of this as your friendly neighborhood security expert clearing up the confusion!
How do lumens relate to a floodlight’s effectiveness?
Think of lumens as the “brightness muscle” of your floodlight camera. Lumens measure how much visible light your floodlight puts out – the higher the number, the brighter your light will be and the larger area it can effectively cover.
Here’s what works best for different spaces: For doorways, porches, or short driveways, you’ll want between 700 to 1,300 lumens. This gives you plenty of light to see clearly and deter unwanted visitors without turning your front yard into a baseball stadium.
For larger areas like long driveways, backyards, or commercial spaces, go for 2,500 lumens or more. These powerhouse lights can illuminate significant distances and provide comprehensive coverage that makes intruders think twice about approaching your property.
The light isn’t just about seeing what’s happening – it’s a powerful psychological deterrent. Most burglars prefer to work in the shadows, so a well-lit area often sends them looking for an easier target elsewhere.
Can I install a floodlight camera on a dimmer switch?
Absolutely not – and this is really important! Floodlight cameras need steady, consistent power to run their cameras, smart features, and motion sensors properly. Dimmer switches and floodlight cameras are like oil and water – they just don’t mix.
Here’s why connecting to a dimmer can spell disaster: The inconsistent power flow can fry the internal electronics, leaving you with an expensive paperweight instead of a security camera. The camera might not turn on reliably, fail to record properly, or constantly lose its Wi-Fi connection. Even worse, using incompatible power sources often voids your warranty.
Your floodlight camera needs to be connected to a standard, non-dimmable power source that stays on 24/7. This ensures all the smart features work as designed and your home stays protected around the clock.
Do I need an electrician for this installation?
This is probably the question I get asked most, and my answer always starts with: “It depends on your comfort level and what you’re working with.”
If you’re replacing an existing floodlight fixture and you’re comfortable with basic wiring, then a floodlight cam installation can definitely be a DIY project. We’re talking about identifying which wire is ground, neutral, and hot, then connecting them with wire nuts – pretty straightforward stuff. Most handy homeowners can knock this out in about 30 minutes.
But here’s when you absolutely should call a licensed electrician: If there’s no existing wiring at your desired location, you’re looking at a much more complex job. Running new electrical cable, installing junction boxes, and ensuring everything meets local codes requires specialized knowledge and tools.
Also, if you feel even slightly unsure about any part of the electrical work, don’t risk it. Your safety is worth way more than saving a few bucks on installation costs. There’s no shame in calling a professional – even us security experts know when to bring in an electrician for the tricky stuff!
At TechPro Security, we handle floodlight cam installation projects throughout South Florida every week. Our experienced team ensures your installation is safe, code-compliant, and optimized for the best performance, giving you peace of mind that everything’s done right the first time.
Conclusion: A Brighter, More Secure Home
Congratulations! You’ve just completed a floodlight cam installation that will transform how secure and well-lit your property feels. By combining powerful LED lighting with advanced security camera technology, you’ve created a comprehensive defense system that works around the clock to protect what matters most to you.
The benefits you’ll enjoy go far beyond the technical specs. That motion-activated bright light will make you feel confident walking to your front door after dark. The crystal-clear video footage gives you eyes on your property even when you’re miles away. And those instant alerts? They’re like having a security guard who never sleeps, always watching for anything unusual.
For those who tackled this as a DIY project, there’s something deeply satisfying about enhancing your home’s security with your own two hands. You’ve not only saved money but also gained valuable knowledge about your home’s electrical system. That’s the kind of accomplishment that feels good every time you see those lights activate.
Of course, we always want to emphasize that proper installation is crucial. Electrical work demands respect and attention to safety. If you encountered any challenges during your installation, or if you’re planning a more complex setup that requires new wiring, don’t hesitate to call in the professionals.
At TechPro Security, we’ve been helping South Florida families and businesses stay safe for years. Our experienced team has handled countless floodlight cam installation projects across Miami, Fort Lauderdale, West Palm Beach, and everywhere in between. What sets us apart is our commitment to not just installing your equipment, but ensuring it works perfectly for your specific needs. Our extensive warranties and free US-based support mean you’re never alone if questions arise.
Whether you’ve just finished your DIY installation or you’re considering professional help for a more complex project, investing in your home’s security is one of the smartest decisions you can make. A well-installed floodlight camera doesn’t just protect your property – it protects your peace of mind.
Ready to take your security to the next level? Contact us for expert security camera installation and let our team help you create a comprehensive security solution that fits your home perfectly. Because when it comes to protecting what you love most, you deserve nothing less than professional expertise and reliable support.