

Smart Home Security System Using Arduino: Top Guide 2025
Smart home security system using Arduino represents an affordable and customizable way to safeguard your home. With the integration of Arduino technology, you can improve your home’s security by programming your own system that includes features such as smart doorbells, alarm systems, and automated locking mechanisms. The versatility of Arduino allows homeowners to create a system custom to their specific needs, ensuring maximum protection against potential threats.
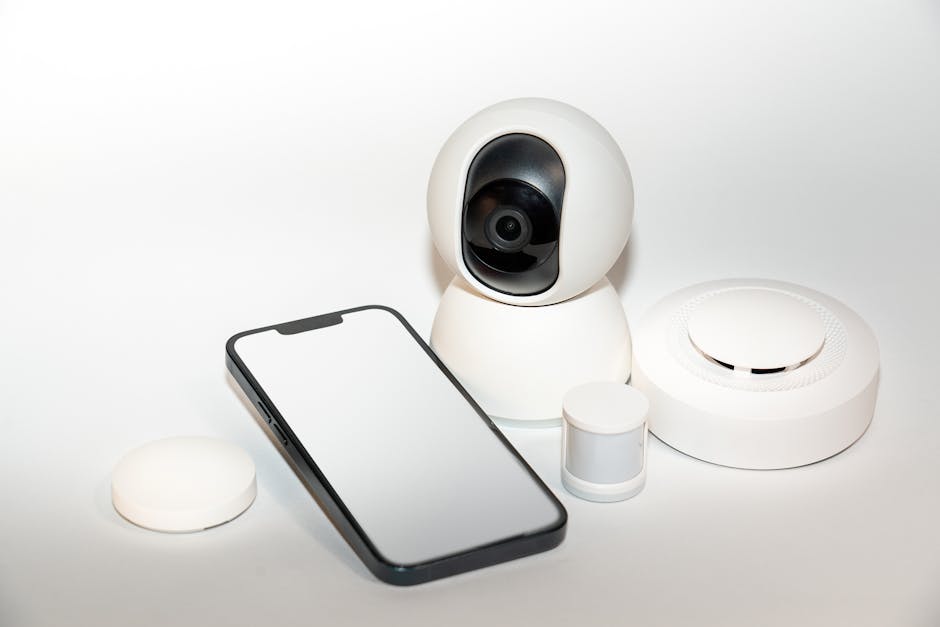
In recent years, home security has evolved beyond traditional locks and alarms. Smart technology and automation offer innovative tools that can significantly improve the safety of your home. From remotely accessible video monitoring to IoT-powered sensors, these technologies give you greater control and peace of mind. For instance, by incorporating smart devices such as motion detectors, you can receive real-time alerts about suspicious activities directly to your smartphone.
I’m Brad Besner, a seasoned security professional with experience in creating custom security solutions. I founded TechPro Security Products over a decade ago, focusing on cutting-edge technologies, including those used in smart home security systems using Arduino, to better protect homes and properties.
Components Needed for a Smart Home Security System Using Arduino
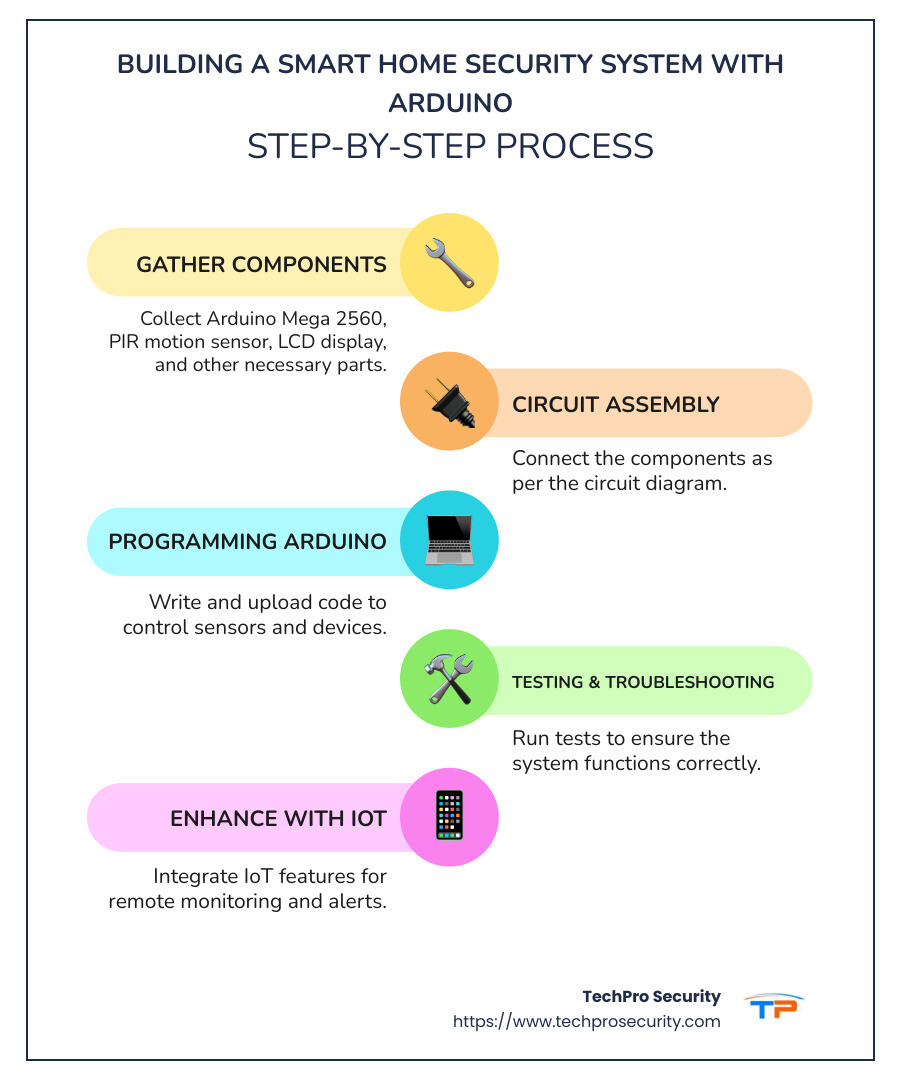
Creating a smart home security system using Arduino involves several key components that work together to ensure your home is safe and secure. Let’s explore what you’ll need to get started.
Arduino Mega 2560
The Arduino Mega 2560 is the brain of your security system. It’s a microcontroller board with plenty of input/output pins, making it perfect for handling multiple sensors and components simultaneously. Its versatility and power make it an ideal choice for more complex projects like home security systems.
PIR Motion Sensor
The PIR motion sensor (Passive Infrared Sensor) is crucial for detecting movement within your home. It works by sensing changes in infrared radiation, which indicates motion. This sensor triggers the alarm system when unexpected movement is detected, enhancing your home’s security by alerting you to potential intruders.
LCD Display
An LCD display allows you to see what’s happening in your security system at a glance. You can use it to display messages such as “System Armed” or “Motion Detected in Living Room.” This component provides a user-friendly interface, making it easier to monitor the system’s status.
Magnetic Door Switch
The magnetic door switch is a simple yet effective component for monitoring doors and windows. When the door is closed, the magnet keeps the switch in the off position. If the door is opened, the switch turns on, triggering an alert. This is essential for knowing when someone enters or exits your home.
Buzzer
A buzzer acts as the alarm in your security system. When triggered by sensors or switches, it emits a loud sound to alert you and deter intruders. It’s a vital component for drawing attention to any security breaches.
Relay Module
The relay module is used to control high-voltage devices with the low-voltage signals from the Arduino. This is particularly useful for integrating other devices, such as lights or additional alarms, into your security system. A relay allows you to automate responses, like turning on lights when motion is detected.
IoT Sensors
IoT sensors bring your security system into the modern age by enabling remote monitoring and control. These sensors can send data to your smartphone or computer, allowing you to keep an eye on your home from anywhere. They add an extra layer of convenience and security, ensuring you are always informed about the status of your home.
Incorporating these components into your smart home security system using Arduino allows you to create a robust and customizable solution. By leveraging the power of technology, you can gain peace of mind knowing your home is protected.
Step-by-Step Guide to Building Your Arduino Smart Home Security System
Building your smart home security system using Arduino can be a fun and rewarding project. Let’s break it down into simple steps to help you get started.
Circuit Diagrams
Before you start connecting components, it’s crucial to have a clear circuit diagram. This will serve as your blueprint, ensuring everything is connected correctly. A well-drawn diagram helps prevent mistakes and makes troubleshooting easier.
- Arduino Mega 2560: This will be the hub of your system, where all components connect.
- PIR Motion Sensor: Connect this to the digital pins to detect movement.
- LCD Display: Use I2C pins for easy communication with the Arduino.
- Magnetic Door Switch: Connect it to a digital pin to monitor door status.
- Buzzer: Hook it up to a digital pin for sound alerts.
- Relay Module: Connect it to control high-voltage devices like lights.
Device Connections
Once you have your circuit diagram, start connecting the devices:
- Power Up: Connect the Arduino Mega 2560 to your computer via USB or an external power source.
- Connect Sensors: Attach the PIR motion sensor and magnetic door switch to the digital pins. Ensure they are securely connected to detect any movement or door activity.
- Attach Display: Connect the LCD display using I2C pins for clear status updates.
- Set Up Buzzer: Attach the buzzer to a digital pin to act as your alarm.
- Integrate Relay Module: Connect the relay module to control additional devices like lights or alarms.
Model House Assembly
To test your setup in a real-world scenario, build a small model house. This helps visualize how the system will work in your home:
- Use cardboard or plywood to construct a simple house with rooms and doors.
- Place the PIR motion sensor in a “room” and the magnetic door switch on a “door.”
- Set up the LCD display and buzzer in an accessible location for easy monitoring.
Testing and Troubleshooting
With everything connected, it’s time to test your system:
- Upload Code: Use the Arduino IDE to upload your code to the Arduino Mega 2560. Ensure it includes logic for detecting motion and door status, and triggers the buzzer and display appropriately.
- Test Sensors: Walk in front of the PIR sensor and open the door to test the switches. Ensure the LCD displays the correct status and the buzzer sounds when triggered.
- Troubleshoot: If something doesn’t work, check your connections against the circuit diagram. Look for loose wires or incorrect pin assignments. Debug your code if necessary.
By following these steps, you’ll have a functional smart home security system using Arduino. This setup will help you keep your home safe and give you peace of mind. In the next section, we’ll explore how to improve your system with additional features.
Enhancing Your Security System with Additional Features
Adding extra features to your smart home security system using Arduino can significantly boost its effectiveness and give you more control over your home’s safety. Let’s dive into some improvements you can implement.
Gas and Flame Detection
To improve your system with gas and flame detection, consider using sensors like the MQ-2 gas sensor and flame sensors. These sensors can detect dangerous gases and flames, helping you prevent potential hazards.
-
MQ-2 Gas Sensor: This sensor is highly sensitive to LPG, smoke, alcohol, propane, hydrogen, methane, and carbon monoxide. By integrating it with your Arduino setup, you can receive alerts when gas levels exceed safe thresholds. This is particularly useful in kitchens or areas with gas appliances.
-
Flame Sensor: Flame sensors can detect fire or flame presence, providing an early warning system to prevent fire damage. Place these sensors in areas where fire risks are higher, such as near fireplaces or in the kitchen.
Motion Detection
Motion detection is a crucial feature for any security system. While you may already have a PIR motion sensor in your setup, consider placing additional sensors in strategic locations around your home to cover more ground.
- Strategic Placement: Install sensors near entry points, hallways, and other high-traffic areas to ensure comprehensive coverage. This allows you to detect any unusual movement and respond quickly.
Cloud Storage and Remote Access
Enhancing your system with cloud storage and remote access can give you peace of mind, even when you’re not at home.
-
Cloud Storage: Store sensor data and alert logs in the cloud. This ensures you have access to historical data, which can be invaluable for reviewing past events or incidents.
-
Remote Access: Set up your system to allow remote monitoring via a smartphone or computer. This way, you can check on your home from anywhere in the world. For instance, Aaron Kow’s IoT home security model, which was part of his engineering project, allows remote access and monitoring through a web-based application, providing real-time updates on home security.
By integrating these additional features, you can transform your smart home security system using Arduino into a comprehensive safety solution. In the next section, we’ll address some frequently asked questions to help you further understand and optimize your system.
Frequently Asked Questions about Smart Home Security System Using Arduino
How to make an alarm system using Arduino?
Creating a DIY home alarm system with Arduino is a fun and educational project. You’ll need an ultrasonic sensor, a piezo buzzer, and an LED to get started. Here’s a simple breakdown:
-
Ultrasonic Sensor: This sensor measures distance using sound waves. Place it near entry points like doors or windows to detect any movement that exceeds a set distance.
-
Piezo Buzzer: When the ultrasonic sensor detects movement, the piezo buzzer sounds an alarm to alert you of potential intruders.
-
LED: Use an LED to provide a visual alert alongside the buzzer. It can light up when the alarm is triggered, offering an additional layer of notification.
-
Coding: Write a simple Arduino sketch to integrate these components. The code should instruct the sensor to monitor distance and trigger the buzzer and LED when movement is detected.
This setup is a straightforward introduction to building a smart home security system using Arduino. It’s both cost-effective and customizable to your specific needs.
How to make a smart home using Arduino?
To create a smart home using Arduino, you’ll need to incorporate IoT sensors, automation, and a relay module. Here’s how you can do it:
-
IoT Sensors: Use various sensors to monitor different aspects of your home, such as temperature, humidity, or light levels. These sensors collect data and help automate your home environment.
-
Automation: Connect sensors to automate tasks like turning on lights when it gets dark or adjusting the thermostat based on room occupancy.
-
Relay Module: This module acts as a switch to control high-voltage devices, like lights or fans, through your Arduino system. It enables you to turn devices on or off remotely.
-
Remote Monitoring: Set up remote access so you can monitor and control your home systems via a smartphone or computer, adding convenience and peace of mind.
By integrating these elements, you can create a comprehensive smart home environment that improves comfort and security.
Is Arduino good for home automation?
Absolutely, Arduino is an excellent choice for home automation due to its power consumption, cost-effectiveness, and user-friendly interface.
-
Power Consumption: Arduino boards are designed to be power-efficient, making them ideal for continuous operation in home automation systems.
-
Cost-Effectiveness: Compared to commercial smart home systems, building your own with Arduino is much more affordable. It allows you to customize your setup without breaking the bank.
-
User-Friendly Interface: Arduino’s programming environment is straightforward, even for beginners. With a bit of practice, you can easily write and upload code to automate various home functions.
Overall, using Arduino for home automation offers flexibility and control, allowing you to tailor your smart home to your unique preferences and needs. In the next section, we’ll wrap up with how TechPro Security can assist in creating custom security solutions.
Conclusion
At TechPro Security, we understand that every home is unique, and so are its security needs. That’s why we specialize in custom security solutions that cater to your specific requirements. Whether you’re looking to improve your home with a smart home security system using Arduino or need advanced access control, our experienced team is here to help.
Our expertise in security solutions ensures that you receive reliable protection for your home or business. With extensive warranties and free US-based support, we strive to provide you with peace of mind. Our team is not just skilled but also passionate about helping you secure your space with the latest technology.
If you’re ready to take the next step in securing your home, consider our smart home installation services. Our professionals will guide you through the process, ensuring a seamless integration of smart technology into your home.
Protecting your home is our priority, and with TechPro Security, you can trust that you’re in good hands. Whether it’s through innovative DIY projects with Arduino or our comprehensive security systems, we’re committed to keeping you and your loved ones safe.